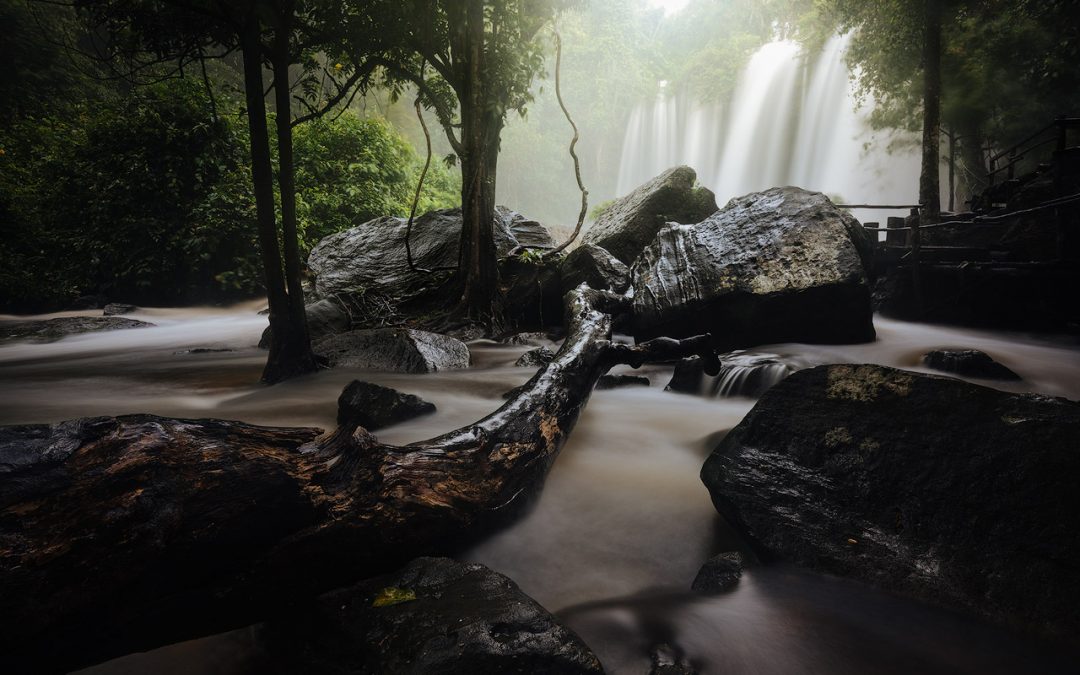
The eagle-eyed among you will have noticed that Chris has been added to our roster of photographers in the last week. We could think of no finer way to welcome him to ATP than to quite literally throw him in the deep end and have him talk us through the process of making this beautiful photograph of the waterfall at Phnom Kulen. Without further adieu, here’s Chris with the second in our “Behind the Scenes” series.
Behind the Scenes
Hey everyone! Thanks for joining us! Today I’m going to walk you through the process of photographing something that a lot of new photographers struggle with, the classic waterfall long exposure.
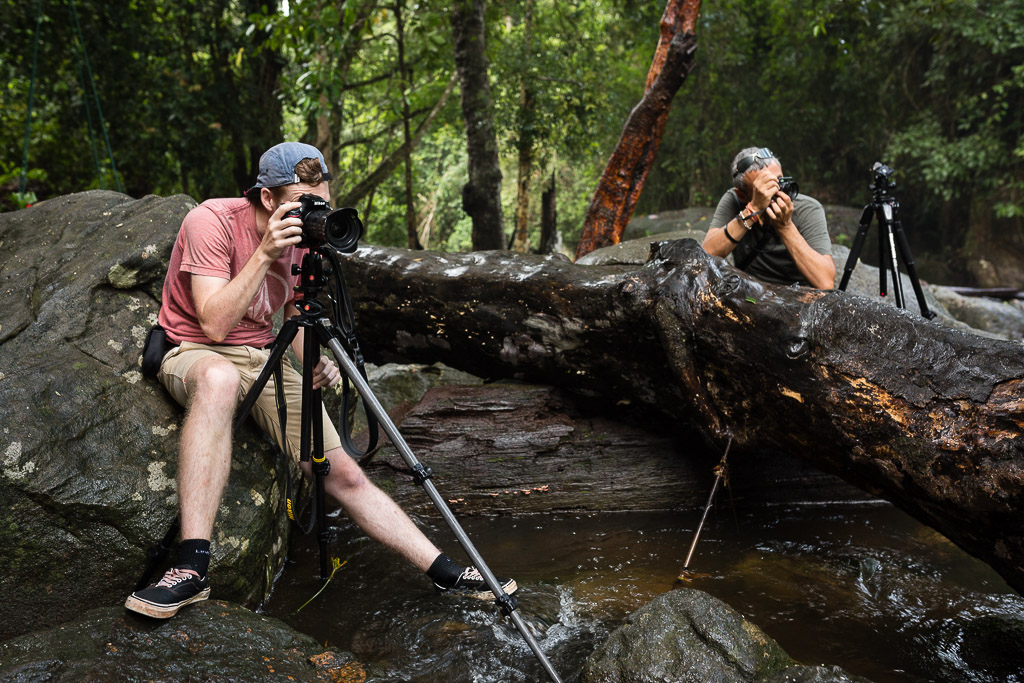
The first stage is, of course, finding a compelling composition. Those of you who’ve had me as your workshop host will know that I’m constantly scanning for leading lines that draw the viewer into the heart of the image; the felled tree lying in the rocks stretching towards the falls was too good an opportunity to be missed, but it meant a precarious climb. I may look like I’m on an island of calm in the picture below, but I had to wade through waist-deep rushing water with the camera held avove my head and have Régis (out of picture) hand me my tripod once in position. To make matters even more complicated, the lower waterfall on Phnom Kulen is a real monster in the rainy season, with spray filling the air even a couple of hundred meters from where the water crashes against the rocks at the bottom. Keeping the camera dry was a challenge, and while the weather sealing on my Nikon body and lenses never fails to amaze me, you have to keep the glass dry to prevent blurry, glowing images. So, how do you master such a tricky shoot?
The key is following a set process so that you get your shot quickly and efficiently. The next stage after finding your composition is to set up your tripod accordingly, ensuring that you have a firm footing so that the tripod doesn’t move an inch. With the river bed below soft and uneven, I opted to use the rocks as my platform. It’s situations like this that show the value of a quality tripod; I love how sturdy and easily-manipulable my Manfrotto 055CXPRO3 is! Once you’re set, you’ll want to set the focus and choose an appropriate aperture – I opted for f/16 here as I was quite close to the felled tree but far from the falls; when you have such separation between two important elements of the photograph, you’ll want to opt for a more extended depth of field. I set my focus to about a third into the scene (where the light reflects on the log) and switched my camera into manual focus before attempting to screw in a filter. With darker ND filters, it’s quite common that your camera will lose the ability to auto-focus and so it’s important to set the focus first to ensure optimum sharpness – if you forget to turn off AF, the camera will attempt to re-focus and will possibly miss. I also set my exposure at this stage, keeping in mind that I’ll need to brighten it by three stops after screwing in my ND8.
With a fall as powerful as this, it’s almost inevitable that you’ll have gotten some spray onto the lens while getting set up. It’s of paramount importance that you dry off your lens BEFORE screwing in your ND filter; I dry the lens off with an absorbent cloth with one hand, then quickly screw in the filter with the other, making sure that I minimise the amount of time the glass is exposed to the spray in the interim. If you get water between the front element and the filter, it doesn’t matter how much you dab down the camera and lens, you’re going to have a fuzzy shot. Once the filter is securely in place, I give it another wipe with the cloth and then drape a towel over the camera and lens – I’ll leave the towel in place for a couple of minutes to ensure that everything is as dry as possible before lifting it up to make my shot when I sense a lull in the spray, replacing it as soon as I here the mirror drop at the end of the exposure. All going well, you’ll have gotten the shot in one attempt; if you’ve been unlucky and been doused by spray in a strong gust, you may need to dry off the lens and try again.
A note on filters: When it comes to ND filters, I always opt for “Slim” versions as I’m most often using them on 16-35mm wide-angle zoom. Filters with a thicker profile have a tendency to vignette on this lens, preventing you from using it at the wider end because of black edging. When on a landscape shoot, I usually have three ND filters with me, an ND4, ND8 and 10-stop ND filter. The ND8 comes in handy most often with waterfalls.
Camera Settings
Camera: Nikon D610
Lens: Nikon 16-35mm f/4 AF-S VR
Mode: manual mode
ISO: 100
Aperture: f/16.0
Shutter Speed: 20sec
Focal Length: 20mm
Flash: No
Tripod: Yes, Manfrotto 055CXPRO3
Filters: Yes, Kenko ND8 Slim
Processing: Adobe Lightroom CC/Photoshop CC
Great shoot CC, and a great tutorial in setup and multitasking, cheers
Cheers Owen. The multi-tasking bit is key… it’s a rare shoot if I don’t end up with a lens cap in my mouth at some point, lol